
Choose a bio link tool that fits your goals
Your bio link is the only clickable real estate you have on Instagram and TikTok. Picking the wrong platform limits your growth before you even start. Don’t just grab the first free option; match the tool to your specific output, whether that’s selling products, growing an email list, or driving traffic to content.
The market has shifted from simple link aggregators to full-fledged microsites. Some tools prioritize analytics for creators, while others focus on checkout flows for e-commerce. Understanding these differences helps you avoid switching platforms later when your needs change.
Compare top bio link tools
Use this comparison to see how the leading options stack up against common creator needs. Look for features that solve your immediate bottleneck, such as email capture or product tagging.
| Tool | Best For | Key Feature | Price |
|---|---|---|---|
| Lnk.Bio | General Creators | Social media integration | Free / Paid |
| Bio Sites | Brand Building | Squarespace ecosystem | Free / Paid |
| Bio Link | Full Personal Sites | Custom posts & embeds | Free / Paid |
Start with the free tier of the tool that aligns with your primary goal. You can always upgrade or migrate once you have a clear sense of which features actually drive conversions for your audience.
Set up your custom domain for credibility
A custom domain like link.yourbrand.com signals professionalism far more effectively than a generic subdomain. When users see a branded URL in their Instagram or TikTok bio, it reduces friction and builds immediate trust. This small detail can significantly increase click-through rates by removing the hesitation associated with unknown or free-link platforms.
Why branding matters
Subdomains from free link-in-bio tools often look temporary or spammy. A custom domain anchors your presence to your primary business identity. It tells visitors that you are established and serious about your craft. This credibility is essential for converting casual scrollers into loyal followers or customers.
How to connect your domain
Most bio link platforms allow you to connect a custom domain directly from their settings dashboard. You will need access to your domain registrar (like Namecheap or GoDaddy) to update your DNS records.
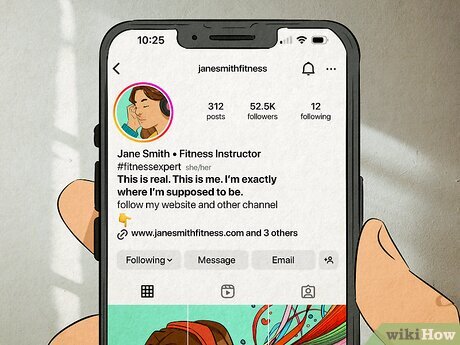
Design a clear and scannable layout
Your bio link page is a digital storefront. If a visitor can’t find what they want in three seconds, they leave. The goal is to remove friction between their interest and your destination.
Start with hierarchy. Place your most important link at the very top. This is usually your latest product drop, a high-value lead magnet, or your primary call to action. Users scan vertically; the first item gets the most attention. Group related links together under simple headers so the eye can jump from section to section without getting lost.
Visual clarity matters just as much as order. Use high-contrast buttons that stand out against your background color. Avoid cluttered backgrounds or busy patterns that make text hard to read. Keep button text short and action-oriented—"Shop Now" works better than "Click Here to See Our Products."
Place your single most important link at the top of the list. Whether it’s a new product launch or a newsletter signup, this spot drives the majority of conversions. Keep this link visible without requiring a scroll.
Use clear section headers like "Latest Collection," "Resources," or "About." This breaks up long lists of links and helps users find specific categories quickly. Limit each group to 3-5 items to prevent decision fatigue.
Ensure buttons have high contrast and ample padding. Use action verbs in the button text. Avoid generic labels like "Click Here." Test your buttons on mobile devices to ensure they are easy to tap with a thumb.
Consistency builds trust. Use the same fonts, colors, and tone on your bio link page that you use on your Instagram and TikTok profiles. This creates a seamless experience that reinforces your brand identity as users move from social media to your landing page.
Add tracking to measure your bio link performance
Without data, your bio link is just a guess. To know which posts drive traffic, you need to track clicks and conversions. This section shows how to add UTM parameters to your URLs so you can see exactly what works.
Start with the destination URL you want to share. This is the link you would normally paste into your Instagram or TikTok bio. Keep it clean and ready for parameters.
Append tracking tags to the end of your URL. Use ?utm_source=instagram, utm_medium=social, and utm_campaign=summer_sale to identify the platform and specific promotion. This tells Google Analytics exactly where the traffic came from.
Click your new link to ensure it redirects correctly. Once verified, replace the old bio link with this tracked version. Monitor your analytics dashboard to see which content drives the most clicks.
Using UTM parameters turns your bio link into a measurable asset. You will quickly learn which posts generate interest and which ones fall flat. This data helps you refine your content strategy for better results.
Keep your bio link current
Static links become digital dust. When your Instagram or TikTok bio link points to a campaign that ended months ago, you’re handing your audience a dead end. Every outdated link is a missed conversion and a signal that your brand isn’t active.
Treat your bio link as a living dashboard, not a static business card. Align the links with your current content rhythm. If you just dropped a new product, that should be the first button. If you’re promoting a limited-time discount, swap the permanent store link for the sale page. This keeps the path to purchase short and relevant.
You don’t need a complete redesign every week. Simple updates maintain momentum. Check your analytics monthly to see which buttons get clicks and which gather cobwebs. Replace the low-performers with fresh content from your latest posts or recent blog entries.
Regular updates also signal to the algorithm that your profile is active. While the direct SEO impact is debated, user behavior tells a different story. Visitors who find current, useful links are more likely to engage, follow, and buy. A stale bio link is the fastest way to lose that trust.
Common bio link mistakes to avoid
Your bio link is the only clickable asset in your social profiles, so clutter or broken elements immediately kill conversions. Treat it like a digital storefront: if the entrance is blocked or confusing, visitors leave.
Cluttered layouts Too many links dilute your message. When you list ten options, users struggle to choose, and your click-through rate drops. Prioritize the three most important destinations and remove the rest.
Broken links A single dead link signals neglect. Check every URL before publishing and set up a system to update them when campaigns end. A 404 error is an instant loss of trust.
Ignoring mobile optimization Most traffic comes from phones. If your bio link page loads slowly or requires horizontal scrolling, users will bounce. Test your layout on a real device to ensure buttons are large enough to tap easily.
Launch Checklist for Your Bio Link
Before you share your bio link on Instagram and TikTok, run through this final verification. A broken or unclear link kills conversion rates faster than bad design. Treat this as your pre-flight inspection.
-
Verify all URLs resolve correctly on mobile devices
-
Ensure the landing page loads in under 3 seconds
-
Confirm tracking pixels (Meta/TikTok) are firing
-
Test the link from a non-following account
No comments yet. Be the first to share your thoughts!